|
All care
has been given to present these patterns in the original form.
KnitHeaven
is not responsible for errors.
Another Table-Cover.
This cover is made of pale-brown Turkish toweling. Cut a piece of the size to
suit your table, and baste all round it, first a row of scarlet worsted braid,
then of olive, then of yellow, leaving spaces each an inch and a half wide
between the rows. Cat-stitch the braids down on both edges with saddlers' silk,
and feather-stitch between them in silks, choosing colors which harmonize, and
turning the whole into a wide stripe brilliant and soft at the same time. The
choice and placing of the colors will be excellent practice for your eye, and
after a little while you will be able to tell, as soon as a couple of inches are
done, if you are putting the right tint into the right place. It is infinitely
more interesting to feel your way thus through a piece of work than to follow
any set pattern, however pretty, and it is far more cultivating to the taste.
Take a piece of white, or tinted, or
silver paper, exactly ten and a half inches
square. Fold it double diagonally. Fold it
double again. Fold it double once more.
You will now have a triangular-shaped form of
eight thicknesses. Now lay this folded piece on a
pine table, or on a smooth piece of pine board. Next,
lay evenly over it, so that it will fit exactly, the "pattern
of transparency," or an exact tracing from it. When so placed,
secure them firmly to the board by pins driven in at each corner.
Now, with a very sharp pen-knife follow and cut through to the
board the lines of the pattern, so as to cut out all the portions that
show black in the design. When this is all done, pull out the pins,
open your folded paper, and you will have a square form beautifully
figured in open-work. It should be laid between two sheets of white paper
and carefully pressed with a hot iron, and then it can be lined with black or
fancy tissue paper, and hung against a pane in the window as a "transparency;"
or you may use it as a picture-frame, inserting an engraving or photograph in the center.
The original, from which our pattern is taken, was cut during the late war by a young
Union soldier while in Libby prison.
These bags are capital things to save a shawl from the dust of a journey, and, if of good size,
can be made to serve a useful purpose by packing into them dressing materials, etc., for which
there is not room in your hand-bag. The best material for them is stout brown Holland. Cut two
round end-pieces eight inches in diameter and a piece half a yard wide by twenty-four inches long.
Stitch these together, leaving the straight seam
open nearly all the way across, and bind its edges
and the edges of the end-pieces with worsted braid
(maroon or dark brown), put on with a machine.
Close the opening with five buttons and button-holes.
Bind with braid a band of the Holland two
inches wide, and fasten it over the button-holed
side, leaving a large loop in the middle to carry
the bag by.
By way of ornament you may embroider three
large letters in single-stitch on the side, using
worsted of the color of the braid, or may put a
pattern down either side of the opening and round
the ends in braiding, or a braided medallion with
initials in the center.

JAPANESE HANGING-BASKET OF STRAW AND SILK.
You will never guess what the top of this droll
little basket is made of, unless we tell you. It is
one of those Japanese cuffs of brown straw
which can be bought nowadays for a small price at
any of the Japanese shops. You may embroider a little
pattern over it—diagonally, if you wish to make
it look very Japanese-y; line it with silk or satin,
and fasten a small bag of the same material to the
bottom, drawn up with a ribbon bow or a tassel.
A band of wide ribbon is sewed to the top. Grandmamma
will find this just the thing to hang on her
arm for holding her knitting-ball,
or the knitting itself if she wishes to lay
it aside. This sort of basket also is useful as a
"catch-all" when hung at the side of a dressing-bureau.

A CATCH-ALL MADE OF PERFORATED PAPER.
This is very pretty, and very easily made. Take
a piece of silver (or gold) perforated paper, eight
inches square, and ornament it with worsted or
silk, as in the diagram, all in one direction. To
make the cornucopia, it is only necessary to join
any two edges (as A and B) by first binding each
with ribbon and then sewing them together. Line
with silk, and put box-plaiting at the top. A
worsted tassel might be put at the top (in front) as
well as at the bottom, and a loop at C.
If silver paper is used, the trimmings would better
be all red. All blue would look well with gold
paper. But the colors may be varied according to
taste. If your friend is a brunette, you will find that
he or she will be most pleased with the red, while
a blonde will prefer blue.
DIAGRAM OF PATTERN TO BE WORKED ON PERFORATED PAPER FOR A CATCH-ALL.
DIAGRAM OF WALL-POCKET.
WALL-POCKET OF SPLITS.
Splits, or cigar-lighters as they are sometimes
called, are to be had at any of the fancy shops.
They are an inch wide and about seven inches
long, and come in various shades of brown and
straw color, and their flexibility makes it easy to
weave them in and out like basket-work. For the
wall-pocket you must weave two squares, each containing
six splits each way, but one made larger
than the other, as seen in the picture. A few
stitches in cotton of the same color will hold the
strips in place. Line the smaller of the squares with
silk, and lay it across the face of the other in such
a way that the four points shall make a diamond,
touching the middle of each side of the square.
Fasten it to the wall by two of the splits crossed
and united by a bow of ribbons, and fill the pocket
with dried autumn leaves and ferns gracefully arranged.
This is rather a Christmas game than a present,
but will answer well for either; and young folks
can get much fun out of an evening spent in "taking"
each other. Each in turn must stand so as to cast
a sharp profile shadow on the wall, to which is previously
pinned, white side out, a large sheet of paper, known as silhouette
paper, black on one side and white on the other.
Somebody draws the outline of this shadow exactly with a
pencil; it is then cut out and pasted neatly, black side up,
on a sheet of white paper. Good and expressive likenesses
are often secured, and droll ones very often.
Try it, some of you, in the long evenings which are coming.
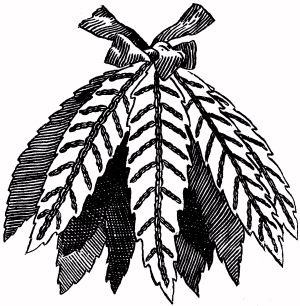
A LEAF PEN-WIPER.
Your pattern for this must be a beech-leaf again,—a
long one this time,—or you may trace the shape
from the illustration. Outline the shape as before,
and from the model thus secured cut six leaves in
flannel—two green, two brown, and two red, or
red, white and blue, or any combination you like.
Snip the edge of each leaf into very tiny points,
and chain-stitch veins upon it with gold-colored
floss. Attach these leaves together by the upper
ends, arranging under them three triply pointed
leaves of black broadcloth or silk to receive the ink,
and finish the top with a small bow of ribbon.
Girls are always trying to find something which
they can make to delight their papas, and a gay little
pen-wiper with fresh uninked leaves rarely comes
amiss to a man who likes an orderly writing-table.
Here is a pretty one which is easily made. For the
pattern you may borrow a moderately large beech-leaf
from the nearest tree (or botanical work); lay
it down on paper, pencil the outline and cut it out
neatly. Repeat this six or eight times in black cloth
or velvet, and sew the leaves round a small oval
or circle of black cloth. Knit and ravel out a quantity
of yellow worsted or floss silk, and with it construct
a nest in the center of the oval, putting a hen into the nest.
This hen may be made of canton flannel, stuffed with
cotton-wool and painted in water color, with a comb of
red flannel, two black beads for eyes, and a tuft of
feathers by way of tail. But better still and much
easier, buy one of the droll little Japanese chicks
which can be had at the shops now for twenty or
twenty-five cents, and fasten it in the middle of the
nest. Three plain circles of cloth are fastened
underneath for wiping the pens.

A Bird's Nest Pen-Wiper.
Japanese Pen-Wiper.
A nice little pen-wiper can be made by cutting
three circles of black cloth, snipping the edges or button-holing them with colored silk, and standing
in the middle one of the droll little Japanese birds
just mentioned. Of course it should be secured
firmly at the feet. There are long-legged birds
and short-legged ones. A tiny stork is very pretty.

A JAPANESE PEN-WIPER.
Some of you who have been pressing autumn
leaves for winter use may like to hear of a new way
of bleaching grasses to mix with them. The process
is exceedingly simple. Take a few of the grasses
in your hand at a time, dip them into a pan of water,
shake gently, dip into a pan of sifted flour, and again
shake gently. All the superfluous flour will fall off, but
enough will remain to make the grasses snowy-white.
When dry it is perfectly firm, and you would never
guess what process produced the effect. A bunch of these
white grasses in a coral-red basket is a vivid object.
Colored grasses, to our thinking, are not half so
pretty as the same grasses when left in their own soft
natural browns and yellows. Still, as some people like
them, we will just mention that the same process
can be used for them as for the white grass, by mixing
with small portions of flour, a little dry paint powder,
vermilion, green, etc. A bunch of the deep red mixed
with the bleached grass has a gay and uncommon effect.
Plain white porcelain lamp-shades, such as are
used on the German student-lamps, look well when
decorated with wreaths of autumn leaves put on
with mucilage. We read lately in the Tribune
that leaves treated with extract of chlorophyl became
transparent. This would be a fine experiment
for some of you to try, and a garland of the
transparent leaves would be much more beautiful
around a shade than the ordinary dried ones.
There are other styles of lamp-shades that can
be made with little difficulty, for instance: A
very pretty shade is easily formed by cutting in
thin drawing-board fine scalloped sections, which,
tied together with narrow ribbon, take the form
of a shade. Leaves are glued to the under side of
these, and a lining of thin tissue-paper is pasted on to
hold them in place. Still another is made in the same
way, with doubled sections of card-board, between each
pair of which is laid a steel engraving or wood-cut, or
an unmounted photograph. The pictures are invisible
till the lamp is lighted: then they gleam forth with
something of the soft glow of a porcelain transparency.
In any of the fancy shops you can now buy the slender
frames of silvered tin on which these boxes are made.
Cut out double pieces of pale-tinted silk to fit the
top, bottom, sides and ends, and quilt each separately
with an interlining of cotton batting, on which sachet-powder
has been lightly sprinkled. Slip the pieces
between the double rods of the frame, sew over and
over, and finish with a plaited satin ribbon all
round, adding a neat little loop and bow to lift the lid.
The small tin boxes in which fancy biscuits are
sold can be utilized for glove-boxes, covered as you
choose on the outside, and lined with wadded silk.

SILK GLOVE-BOX.

DIAGRAM SHOWING THE MANNER OF TUFTING
THE LINING OF SILK GLOVE-BOX.
This box can be made in very stiff card-board,
but tin is better if you have the pieces which form its
shape cut by the tinman, and punched with holes
in rows an inch and a half apart. If you use card-board,
you must punch your own holes, measuring
the places for them with rule and pencil. In either case, you will need the same number of pieces and
of the same size, namely: two strips one foot long
and five inches wide, two strips one foot long and
three inches wide, and two strips five inches long
and three inches wide. Cover each piece with a
layer of cotton wadding, sprinkled with sachet
powder, and a layer of silk or satin of any color you
prefer. Then catch the silk firmly down through
the holes in the tin, making long stitches on the
wrong side, and small cross-stitches on the right,
so as to form neat regular tufts. A very tiny button
sewed in each depression has a neat effect.
When the inside of the box is thus tufted, baste the
pieces together, cover the outside with black or
dark silk or satin, embroidered or ornamented in
any way your fancy may dictate, overhand the
edges daintily, and neatly finish with a small cord.
Square boxes made in the same way are pretty
for pocket-handkerchiefs.

COAL-SCUTTLE PINCUSHION AND NEEDLE BOOK.
A Coal-Scuttle Pin-Cushion.
This droll little scuttle is made of black enamel
cloth, cut according to the diagrams on next page.
Fig. 1 is cut double and folded over at G. The
two sides marked B and E in Fig. 1 are bound with
black galloon; also the two sides marked with the
same letters in Fig. 2.
Before binding over, cast a bit of wire around the
top and one around the bottom of the scuttle, and
bend each into its proper shape. Figs. 3 and 4 are
bound all round, and sewed over and over to the
places indicated. Wrap two bits of wire, one four
inches long and the other an inch and a quarter, with
black worsted, and insert them through little holes
made for the purpose to serve as the handles of the
scuttle; stuff the inside firmly with hair or cotton-wool,
cover the top with flannel, cut after Fig. 4,
and button-hole the edges down all round
with worsted of the color of the flannel. If
you like to add a needle-book you can do so
by cutting three leaves of differently colored
flannels, after the shape of Fig. 4, snipping
the edges into points, or button-holing
them, and fastening the leaves to the back
of the scuttle above the pincushion.
There are notable little sempstresses even
in these days of machines ("and I am
thankful to know that there are," says
Mother Santa Claus) who set their stitches as
swiftly and as precisely as ever their grandmothers
did before them, and have the same liking for what
used to be called "white seam." To such we would
suggest, what a nice and useful
Christmas present would be a beautifully
made under-garment. It need not of necessity be a
shirt, though in old days no girl was considered
educated who could not finish one all by herself,
from cutting out to the last button-hole; but an
apron or petticoat or dressing-jacket or night-gown,
over which little fingers had labored deftly and
lovingly, would, it seems to us, be a most wonderful
and delightful novelty for mamma or grandmamma
to find on the Christmas-tree this year. A set
of handkerchiefs nicely hemmed and marked (girls
used to cross-stitch the marks in their own hair!),
or a soft flannel petticoat, cat-stitched at the seams,
scalloped with coarse working cotton,—which grows
whiter with washing, instead of yellowing like
silk,—with three pretty initials on the waistband,
would be other capital ideas. Try them.
The great convenience of these aprons is that the
work can be rolled up in them and laid aside for use. They are made of brown Holland trimmed
with black or blue or crimson worsted braid. Little
loops of doubled braid ornament the edge, and are
held in place by a plain row of the braid stitched
on above them. The lower and largest pocket
should be made full and drawn up with a cord at
top, so as to hold rolls of pieces, worsteds and patterns.
The little pockets are for spools of silk and
thread, tapes, buttons, and so on.

DIAGRAM OF WORK APRON.
For this needle-book you will need the following
materials: One-eighth of a yard of crimson or
green velvet, one-eighth of a yard of lining silk to
match, one-eighth of a yard of fine white flannel,
two skeins of white silk floss, a bit of Bristol-board,
and a half yard of narrow ribbon.
Cut in the Bristol-board a couple of leaf-shaped
pieces like the illustration. Cover each with the
velvet, turning in the edges neatly, line with the
silk, and button-hole both together all round with
white floss. Stitch the veins in the leaves with the
floss, held tightly, so as to depress the lines a little.
Cut three leaves of flannel in the same shape, button-hole
the edges, lay them between the leaves,
and fasten all together at top with a bow of ribbon.
A tiny loop and button should be attached to the
point to hold the needle-book together.

PAD OF LEAF NEEDLE-BOOK.
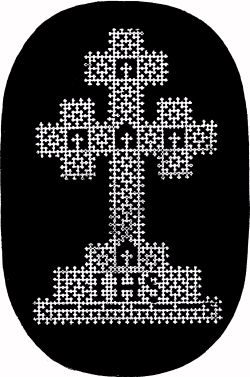
PATTERN OF CROSS FOR BOOK MARK.
Book-Mark.
A large lace-like cross hanging from the end of a
wide ribbon makes a handsome and appropriate
mark for a big bible or prayer-book. The
materials cost almost nothing, all that is required
being a bit of perforated card-board,
a sharp penknife, and—patience. Trace the
form of the cross on the card-board, and outline
the pattern on one side in pencil. You
will observe that the one given as illustration
is made up of small forms many times repeated,
and this is the case with all patterns
used for this purpose. The easiest way to outline it
regularly is to do a square of eight holes at a time,
marking the places to be cut, and leaving the uncut
places white. When all is marked, place on a
smooth board and cut, following the markings
exactly with your knife. The work cannot be hurried:
it must be done slowly and very carefully if
you hope to succeed.

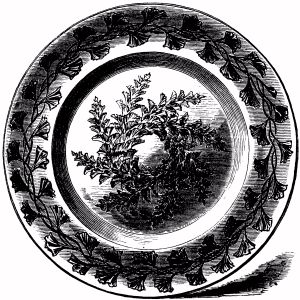
VASE (AUTUMN-LEAF WORK).
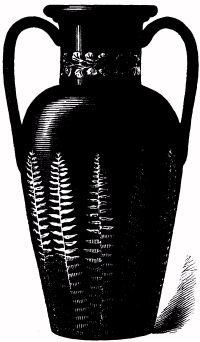
VASE, PAINTED BLACK AND ORNAMENTED
WITH FERNS (AUTUMN-LEAF WORK).
Autumn-Leaf Work.
If you have an old work-box, or desk, or table-top,
or screen, which has grown shabby, and which
you would like to renew, we can tell you how to do
so. First, you must take those generous friends,
the woods, into your counsel. Gather and press
every bright, perfect leaf and spray which comes
in your way this autumn, and every graceful bit of
vine, and a quantity of small brown and gold-colored
ferns, and those white feathery ones which have
blanched in the deep shadows. These ready, paint
your box, or whatever it is, with solid black, let it
dry, rub it smooth with fine sand-paper, and repeat
the process three times. Then glue the leaves
and ferns on, irregularly scattered, or in regular
bouquets and wreaths, as suits your fancy. Apply
a coat of isinglass, dissolved in water, to the whole
surface, and when that is dry, three coats of copal
varnish, allowing each to dry before the next is put
on. The effect is very handsome. And, even
without painting the objects black, this same style
of leaf and fern-work can be applied to earthen
vases, wooden boxes, trays and saucers, for card-receivers.
For these, you may get some good
hints from the illustrations on subsequent pages.
The same illustrations will apply to the "novelties
in fern-work" given further on.
CARD-RECEIVER (AUTUMN-LEAF WORK).

WOODEN BOX, ORNAMENTED WITH FERNS (AUTUMN-LEAF WORK).
A Window Transparency.
Another pretty use for autumn leaves is a transparency
for a window. Arrange a group of the
leaves upon a pane of glass, lay another pane of
same size over these, and glue the edges together,
first with a strip of stout muslin, and then with
narrow red ribbon, leaving a loop at each upper
corner to hang it up by. The deep leaf colors
seen against the light are delightful.
Side-Light Transparencies.
Any of you who happen to live in a house which
has, like many old houses, a narrow side-light on
either side of its front-door, and a row of panes
across the top, can make a pretty effect by preparing
a series of these transparencies to fit the door-glasses,
and fastening them on by driving a stout
tack into the sashes so as to support the four corners
of each pane. The transparencies could be prepared
secretly and put into place overnight, or on
Christmas morning, before any one is up, so as to
give mother a pleasant surprise as she comes downstairs.
Please
do not post these patterns to another website. However, Please feel free
to post a link to this page:
http://www.knitheaven.com/vintagepatterns/morecrafts2.htm |