|
All care
has been given to present this pattern in the original form.
KnitHeaven
is not responsible for errors.
CHAPTER XVIII.
TATTING.
EXPLANATION
and EXAMPLES OF STITCHES.
Tatting Open Stitch.—Take your tatting needle, and, having threaded it
with the appropriate material make a knot at the end. In order to make
the loops, put the knot just made on the fore finger of the left hand,
and form also a loop round the second, third and fourth fingers,
extending them for that purpose. These loops are made by carrying the
thread round the back of them, bringing it to the fore finger again, so
as to pass over the knot. In this position they must be held tightly
down by the pressure of the thumb. You will observe that the thumb and
fore finger are never to be moved while you form the scollop, but you
are to bring the needle and thread toward you in a straight direction
from the fore finger and thumb, between the second and third fingers:
the needle is then to be inserted from behind the finger loop, up
through the middle, between the thread[154] which is on the needle, and the
thread round the fingers. You must be careful to have the thread (on the
needle) between you and the needle, after you have drawn it through.
From the right hand to the left the needle must be extended as tight as
possible, leaving loose the loop which is round the finger as you make
the stitch with the loop, and not with that portion of the thread which
is next the needle. You are to withdraw the second finger, and allow the
loop round the fingers to form round the thread. The fingers are then to
be again inserted, and form the stitch with the second finger by drawing
it up to its proper place, close to the thumb. This will finish the
stitch. For the next, cast the thread over the back part of the hand,
instead of bringing it to you as in the former stitch, and let the
needle be inserted down through the finger loop, between the first and
second fingers; then draw it up through between the two threads over the
back part of the fingers, and form the stitch with the second one, as in
the previous stitch. You work the third stitch the same as the first,
only longer, that it may form a long loop. Repeat the second stitch,
then the long loop; and thus proceed until you have seven loops: after
this, the thread is to be drawn up, so as to form the scollop.
Star Tatting.—The material for this kind of work is bobbin, such as is
generally used for children’s caps. You have only to work six scollops
and draw them up close, so as to form a star. When made with precision
and regularity, they present a neat appearance. Star tatting is well
adapted for trimmings to a great many articles of apparel and ornament.
[155]
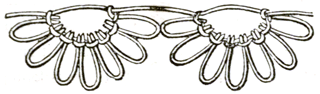
Common Tatting Edging.—Make the loops, and work the first stitch as in
the first pattern; then work twenty stitches the same way to form the
scollop. When it is finished, you must draw up the thread tight, and
then commence another. If it has been properly done, the scollop will
draw freely.
Please
do not post this pattern to another website. However, Please feel free
to post a link to this page:
http://www.knitheaven.com/vintagepatterns/lwtb_CHAPTER_XVIII.htm |