Chapter 6
Edging No. 2 and Edging No. 3
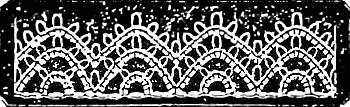
- Fill the plain shuttle with Ardern’s crochet cotton No. 12. Pin No. 2.
- 1st Row. Work a sufficient length of ovals; 3 D (L, 3 D twice) not drawn up quite close, and leaving ½ an inch of cotton, or more, between each.
- Fill the figured shuttle with Evan’s Boar’s-head No. 20, and refil the plain shuttle; tie the cottons together.
- 2nd Row. With the plain shuttle thread round the little finger; L, 2 D, L, 1 D tie to the 1st L of 1st oval; 1 D (L, 2 D twice); L, 1 D tie to the 2nd L of the 1st oval; 1 D, L, 2 D tie to the thread between the ovals. Repeat till all the ovals are finished.
- 3rd Row. Begin again by tying in the 1st L of last Row. With the plain shuttle thread round the little finger; L, 1 D tie to the next L of the 2nd Row; (1 D, L, 1 D tie to the next L of the 2nd row twice;) 1 D, L, 1 D, tie to the same L; [1 D, L, 1 D tie to the next L of the 2nd Row twice] 1 D, tie to the next L of 2nd Row, and repeat to the end of the strip. Or this row may be worked without loops—if they are objected to.
- To make a strong foundation for this edging. Take the plain shuttle, and tie to the foundation cotton of the ovals, twice, between each oval; or on either side of the ties in the 2nd Row.
Edging No. 3
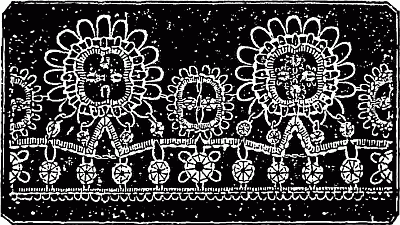
- Fill the shuttles with the same cottons as in the 1st Edging, and use the same pins. The coarser sizes will make this edging an inch and a half deep. Tie the cottons together.
- Begin an oval with the plain shuttle; 3 D, L, 3 D draw tight. With the plain shuttle thread work 4 D.
- Begin a looped oval with the plain shuttle; 2 D (L, 2 D 5 times) draw very tight.
The Leaf. Begin a figured shuttle oval; 2 R D (L, 2 R D 5 times) join to the 3rd L of the last row of the Rosette; 2 R D (L, 2 R D 14 times) draw tight. At a little distance begin a plain oval with the figured shuttle; 3 D join to the thread of the Leaf under the join; 3 D draw close. Begin a plain oval with the figured shuttle quite close to the last; 3 D join to the thread under the 9th L of the 14 of the Leaf; 3 D draw tight. Tie round the foundation thread of the two plain ovals, and leaving a short space of cotton, tie between the 4th and 5th Ls of the 14 of the Leaf; tie again below the plain ovals and round the foundation thread of the leaf.
[With the plain shuttle thread round the little finger, 4 D. Begin a plain shuttle oval, 3 D; L, 3 D draw close. Work a similar figured shuttle oval, and tie round its foundation thread. Repeat twice.] With the plain shuttle thread, 4 D.
The Rosette. Leave a space of each cotton. Begin a figured shuttle oval, 1 D (L, 1 D 7 times) draw close. With the plain shuttle thread (L, 1 D 7 times). [Begin a figured shuttle oval, 1 D (L, 1 D 3 times) join to the centre L of last oval; 1 D (L, 1 D 3 times) draw tight. With the plain shuttle thread (L, 1 D 7 times). Repeat 3 times.] Tie to the foundation thread of the 1st of these ovals. Tie to the 1st L of the 1st 7. With the plain shuttle thread round the little finger (L, 1 D tie to the next L but one 11 times). Tie with the plain shuttle thread to the 15th L of the leaf; 1 D tie to the next L but one. Tie with the plain shuttle thread to the L of the 1st figured shuttle oval; 1 D tie to the next L but one. Tie with the plain shuttle thread to the L of the 2nd figured shuttle oval; 1 D tie to the next L but one, [4 D. Begin a plain shuttle oval, 3 D, L, 3 D draw tight. Begin a figured shuttle oval, 3 D join to the 1st L of the last round of the Rosette; 3 D draw tight and tie to its foundation thread. Repeat once, joining the figured shuttle oval to the 2nd L of the Rosette,] 4 D. Repeat to the required length, beginning with the looped oval.
For the Foundation. Tie the threads together in the L of the 1st plain shuttle oval, holding the work in the hand and the right side up. With the plain shuttle thread round the little finger (L, 1 D, 4 times) tie in the 3rd L of the next oval, (L, 1 D, 4 times) tie in the L of the next oval, [(L, 1 D, 3 times) tie in the L of the next oval. Repeat 3 times.] Repeat from the beginning till all the ovals are finished.
Reprinted from The Bath Tatting Book, by P.P. (1865). Free for personal use. Please share a link rather than copying this page.