Chapter 2
Chapter II. The First Lesson
Reed is a brittle material, therefore it must be soaked in water before using. The time required depends on the number of the reed used. No. 00 merely dipped in water can be used successfully. Nos. 1 and 2 can be used after soaking in water ten minutes; Nos. 4 and 5 after fifteen or twenty minutes. Either cold or hot water may be used, the hot water consuming less time to soak the reed than the cold.
No. 4 and No. 2 reeds are commonly used together in ordinary sized baskets. No. 4 for the spokes, which form the foundation upon and around which No. 2, as the weaver, is woven.
The weaving of a round mat or basket is begun in the center and woven out toward the end. It is absolutely necessary that beginners master the fundamental steps, for no basket can be well made that has a poor bottom. In order to avoid this, the mat is practised upon until the art of weaving a good center is accomplished.
The following are the commonest weaves used.
Simple Weaving is the commonest of all and is the continuation of under one spoke and over the next.

Diagram No. 1.—Simple Weaving
Double Weaving, the same as simple weaving only that two weavers are woven together as one.

Diagram No. 2.—Double Weaving
Pairing.—Two weavers are inserted back of two successive spokes and crossed between, then under weave brought forward each time and made the upper weave. This may be used on an even as well as odd number of spokes.

Diagram No. 3.—Pairing
Double Pairing.—The weave is the same as pairing but two weavers are woven together as one.

Diagram No. 4.—Double Pairing
Two and One Weave.—Simply a weaver woven in front of two spokes and back of one spoke. This makes a pretty effect in oval reed.

Diagram No. 5.—Two and One Weave
Three and Two Weave.—One weaver woven in front of three spokes and back of two. This weave is used with oval reed and rush, in making scrap baskets.
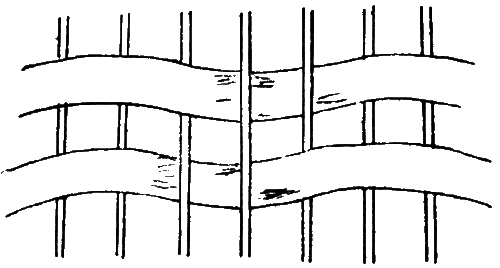
Diagram No. 6.—Three and Two Weave
Triple Twist or Three-Rod Coil, sometimes called the “Wale” Weave.—Three weavers start back of three consecutive spokes. Beginning with the first spoke to the left and weaving to the right bring the left-hand weaver out in front of the next two spokes, back of the next and out in front. The second and third weavers are treated in the same way, always bringing each weaver in front of 2 spokes and back of the next one. This weave is used mostly in beginning the sides of separate bottom baskets where the spokes are inserted, and in the ending of baskets. It is a strong foundation for borders and handles.

Diagram No. 7.—Triple Twist or Three-Rod Coil
Four-Rod Coil or Rope Twist.—Is woven in a similar manner to the three coil weave except that the weavers are brought in front of 3 spokes and back of one.
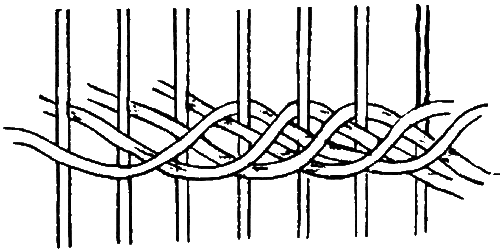
Diagram No. 8.—Four-Rod Coil
Five-Rod Coil.—The weavers are brought in front of 4 spokes and back of 1 spoke.
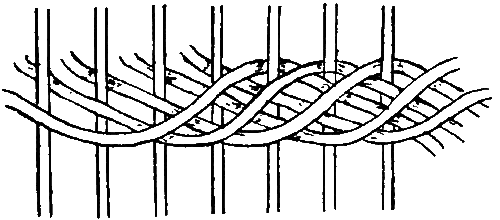
- Diagram No. 9.—Five-Rod Coil
- Upsetting.—Simply a strong weave used in turning up a basket. Three rows of a three or four coil weave are usually used in making an upsetting on a scrap basket.
- Slewing.—Two or more weavers used as one in single weaving.

Diagram No. 10.—Slewing
The Sixteen-Spoke Center means sixteen spokes arranged in groups of fours in the following manner: first, four spokes are placed in a vertical position, the next four in a horizontal position over the first four, the remaining eight spokes arranged in diagonal positions, one diagonal four laid over the other diagonal four in an opposite direction. A weaver is placed under the left-hand horizontal group and simple weaving is woven over one group and under another until four rows are completed. The spokes are then separated into groups of twos by bringing the weavers over and under every two spokes instead of four. This may be finished either in simple weaving with one weaver, or by inserting another weaver, in pairing.

- Diagram No. 11.—Sixteen-Spoke Center
- In cutting the ends of spokes always cut obliquely to prevent the reed from splitting.
- In splitting spokes, the incision must be made carefully in the center of the spoke. Do not make the incision larger than is necessary.

- Diagram No. 12.—A Split Spoke
- Half of the number of spokes needed should be split in center, and the other half inserted through the incision.
- In beginning a new weaver join it to the other weaver by crossing both ends back of a spoke.

Diagram No. 13.—Joining Weavers
Reprinted from Practical Basketry, by Anna A. Gill (1916). Free for personal use. Please share a link rather than copying this page.