Chapter 5
Designs in Modern Lace, Part 1
Designs, Lace Articles, Edgings, Insertions, Etc. in Modern Lace
Of necessity, most of the designs and specimens given on this and the following pages are smaller than the articles they represent, but they afford a correct idea of the method of making and the beauty of Modern Lace, and also its adaptability to dainty accessories of the toilet and the household. As before mentioned any design desired can be obtained from any lace-making establishment in any size, width or shape, according to the requirements of the article or lace to be made, and individual taste. Ingenious students will no doubt be able to adapt for themselves the designs offered, but it is not advisable for those who have no talent in the matter of drawing or designing to undertake an elaborate adaptation, though they may easily accomplish a simple one. Besides, a professional designer will furnish the design for a moderate sum, perfectly outlined upon tracing cloth, with ink, and with the proper filling-in stitches perfectly delineated; and if the student wishes it, will select the thread and braid appropriate for the design; or the student may select the braid she fancies, and the designer will then select the thread suitable for the braid.
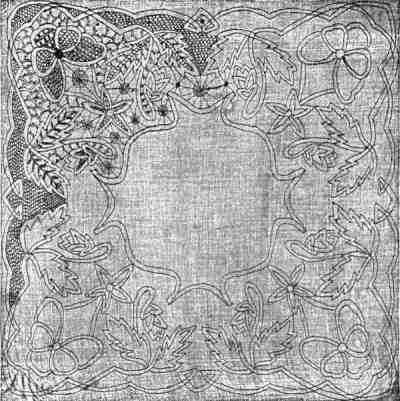
1Design for a Lace Handkerchief
This design is suitable for point lace braid, but is of course very much reduced in size, in order to show the effect and arrangement of a design ready for working, as sent out from the lace-maker’s. By a reference to the various stitches illustrated on preceding pages, the stitches shown in one corner of the design may be readily identified. The following engraving shows how braid is applied to a design before the stitches are begun.
No. 1.—Design for a Lace Handkerchief.
2Method of Placing Braid Upon Designs
This illustration shows the method of arranging braid upon designs for modern lace, and how, after the braid is basted along the pattern, the tracing cloth is basted to toile cirée or to smooth, light brown wrapping paper to provide sufficient firmness for working.
The following instructions apply particularly to engraving No. 2, but their principle should be observed and applied to any design decided upon, as good results in lace-making largely depend upon the arrangement of the braid.
Run on a straight line of braid for the lower edge, with fine stitches, working as shown, from left to right. Take another piece of braid, or the other end of the same piece, and begin to lay the braid by “running” stitches in its center, keeping it as smooth and even as possible. The outer edge presents no difficulty, but the inner edge will not lie evenly without being drawn in by a needle and thread, as follows: Fasten whipping thread securely, and insert the needle in and out of the edge of the braid, as if for fine gathering; this thread when drawn up will keep the braid in its place. Two or three fastening-off stitches should be worked when each circle, half circle, or rounded curve of a pattern is finished, as the drawing or gathering thread remains in the work, and forms an important, though unseen, part of its structure.
Before cutting off the braid run a few stitches across it to prevent it from widening. Joins should be avoided, but when a join is indispensable, stitch the braid together, open and turn back the ends, and stitch each portion down separately. When passing the thread from one part to another, run it along the center of the braid, allowing the stitches to show as little as possible. In commencing, make a few stitches, leaving the end of the thread on the wrong side and cutting it off afterwards. In fastening off, make a tight button-hole stitch, run in three stitches, bring the needle out at the back, and cut off.
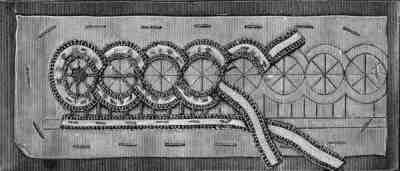
No. 2.—Method of Placing Braid upon Designs.
3Royal Battenburg Lace Bureau-scarf
The engraving on the opposite page represents the article above mentioned, and shows the effectiveness of this magnificent and durable lace. In actual size the scarf is about a yard and one-half long and one-half yard wide, and is made of a heavy Battenburg braid, having a fancy edge (See Nos. 5 or 7, on page 20) and cord, rings and buttons. The main part of the design is outlined with the braid, cord is used as a veining for the leaves, and the rings and buttons are introduced here and there over the surface, as seen in the picture. Raleigh bars with picots connect the border and center designs, while the palms along the border as well as other small spaces are filled in with point Turque and point de Grecque stitches. Sorrento bars are also used in some of the long leaf-like spaces, while in a few of the circular spaces point d’Angleterre rosettes are introduced. These rosettes are also frequently called “spiders,” and are made, according to the space, large or small; and according to the requirements of the braid selected, heavy or light.
For convenience in giving the name of this lace, the full title is rarely used—”Battenburg Lace” being considered sufficient to identify the fabric from the other and lighter laces.
Battenburg lace is made both heavy and light, according to personal taste or the object for which the lace is intended, but it was originally designed for heavy work only.
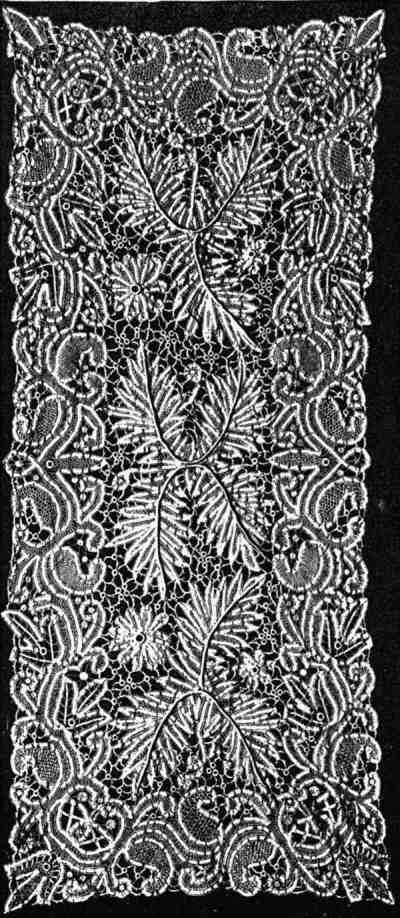
No. 3.—Royal Battenburg Lace Bureau-scarf.
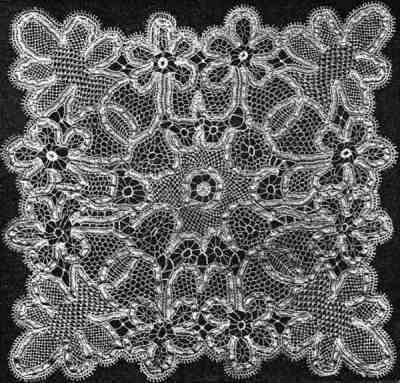
4Point Lace Doily for a Toilet Cushion
This dainty doily may be made of the point lace braids illustrated at Nos. 30 and 31, together with the picot edging No. 36, seen on page 20. In filling in the spaces, thread suitable for the braid is used, and the stitches are point de Valenciennes, point d’Espagne, Sorrento bars, point de Bruxelles, open rings and “spiders.” As all of these stitches, with many others are illustrated in that section of this book devoted to stitches, it will be unnecessary to repeat the details for making, as they are fully given in the department mentioned. It will also be understood that most of the articles illustrated are not of full size, but in some instances are nearly so. The doily just described is illustrated about three-quarters of its actual size; but by using a fine braid a doily of fairy-like texture, and just the size of the engraving may be produced. Any one accustomed to drawing may enlarge this or any of the designs given, but only clever fingers should try this experiment.
No. 4.—Point Lace Doily for a Toilet Cushion.
5Battenburg Edging, with Cord
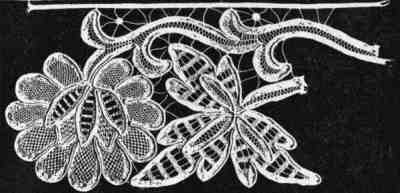
This is a very elegant looking lace, though simply made after the regular Battenburg method. A plain braid (No. 10, page 20) is chosen to form the outlines, and after the stitches are filled in, cord of a suitable size is carried around the petals and foliage of the design, and rows of it are also used to indicate the vine, though the latter may be outlined with the tape and then with the cord. The petals of the blossoms are filled in in point de Bruxelles and point de Venise stitches, while point d’Espagne and point Brabançon are used for the foliage and vine. Point Grecque and d’Alençon bars are also used at the very heart of the blossom, and Raleigh net-work bars connect the design to the edge and are dotted here and there with “spiders.”
No. 5.—Battenburg Lace, with Cord.
6Battenburg Insertion, with Cord
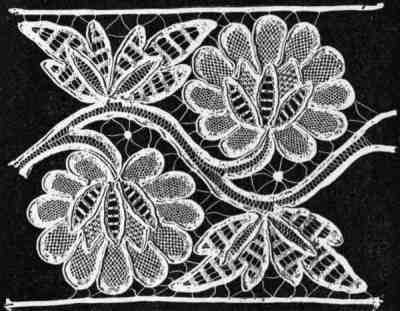
This insertion matches the edging or lace above described, and is, therefore, made in exactly the same way, except that the design is double. Both the edging and insertion may be made of any width desired; and the design will be found very pretty for fancy-edge or plain braids without the cord. Buttons or rings may be used in place of the “spiders” seen in the engravings if preferred.
No. 6.—Battenburg Insertion, with Cord.
7Design for a Honiton Lace Cap
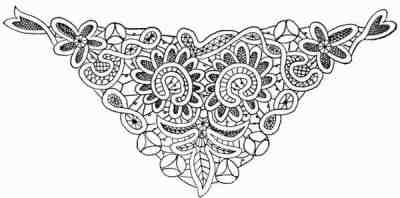
The design illustrated is, of necessity, much smaller than the cap it is intended for; but the clever student may easily enlarge it to, or design one for herself of the size required. Lace-makers will duplicate designs in any size desired for a moderate sum, thus saving the amateur much work and at the same time putting her to little expense.
The design here illustrated might also be used for handkerchief corners, scarf-ends, etc., etc.; and any of the stitches illustrated on preceding pages may be selected for filling-in purposes.
No. 7.—Design for a Honiton Lace Cap.
8Design for a Corner in Battenburg, Point, or Honiton Lace
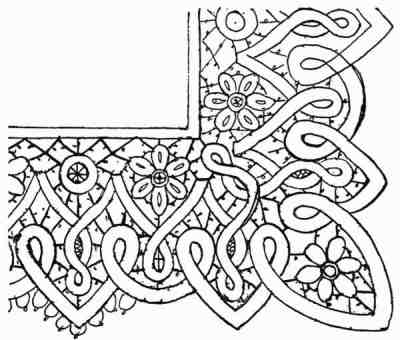
According to the article to be decorated, this design will be found appropriate for either of the braids used for the laces above mentioned.
For table scarfs, tidies, heavy borders, etc., etc., the Battenburg braids should be selected; but for handkerchiefs or doilies, the point or Honiton braids are the proper ones to choose for this design.
Raleigh bars, Brussels point and any other stitches preferred, may be used in filling in the spaces. When a design is procured from a lace-maker a portion of it is always marked with the stitches to be used; but this is not an arbitrary matter, since the one who is to make the lace, may desire to and may insert other stitches in preference to those indicated.
No. 8.—Design for a Corner in Battenburg, Point, or Honiton Lace.
9Doily in “ideal Honiton” Lace-work and Linen Lawn
One of the prettiest and the very newest of the modern laces is here illustrated. It is made of two of the many varieties of Honiton braids, wash-silk floss and linen lawn. The braid is basted smoothly upon a square of lawn in the design illustrated (though individual taste will no doubt suggest many other equally pretty designs), after which the inner edges of the braid are permanently secured by a “short and long stitch.” This is merely a short and long button-hole stitch reversed so that the cross loops are on the edge of the braid, while the stitches them selves extend beyond the braid, into the lawn, as seen in the engraving. Two short stitches alternate with single long ones throughout this part of the work. The outer edges are then fastened to the square by tiny button-hole scollops. Then the lawn is cut from under the squares formed by the braid, and the openings are button-holed through the lawn and braid so that the edges of the lawn will not fray. When this is done the spaces are filled in with fancy stitches, and when they are completed the lawn is cut away from the edge-scollops with a pair of fine sharp, scissors. In the doily illustrated “spiders” and point de Venise stitches are used for filling in the spaces. The floss used may be white or tinted, the latter washing as well as the white; but as a rule, white or yellow flosses are selected in preference to other colors. “Ideal Honiton” scarfs, tidies, doilies, pillow shams, tray cloths, etc., etc., may be purchased with the braid already basted on in a pretty design and with the necessary threads or floss, or they may be designed at home, and by either method will result in a beautiful variety of modern lace.
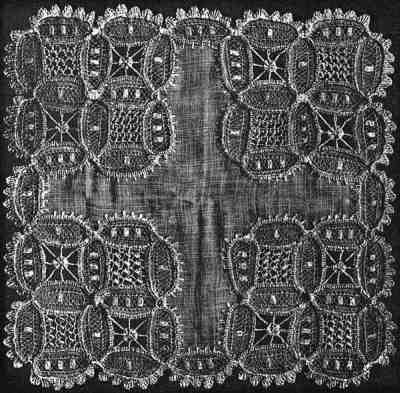
No. 9.—Doily of “Ideal Honiton” Lace and Linen Lawn.
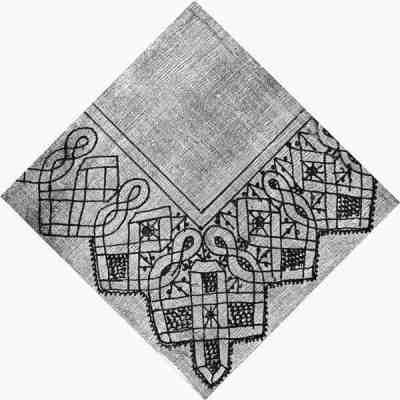
10Design for a Corner in Battenburg Lace
Although this design is intended for Battenburg lace, and may be made up of any of the braids used for that kind of lace, it will also be found suitable for the finer point or Honiton braids for handkerchiefs, doilies, mats, etc., etc. As illustrated it would be suitable for a handkerchief. Enlarged and followed in Battenburg braid it would make a very handsome border for a table-scarf, curtains or draperies, or a substantial decoration for a gown of wash fabric or other goods. Raleigh bars, “spiders” and point de Bruxelles stitches are used for filling in, and a dainty picot edge is sewed to the outer line of the braid. Plain or fancy braid may be used for this design. If fancy loop-edge braid is selected, the picot edge will not be needed, the loops taking its place.
No. 10.—Design for a Corner in Battenburg Lace.
Reprinted from The Art of Modern Lace-Making (The Butterick Publishing Co., 1891). Free for personal use. Please share a link rather than copying this page.