|
All care
has been given to present this pattern in the original form.
KnitHeaven
is not responsible for errors.
CHAPTER II.
PLAIN NEEDLEWORK.
EXPLANATION OF STITCHES.
Before commencing those directions, which we deem it necessary to place
before our readers, in reference to this important portion of the
work-table manual, we wish to say a word or two to our fair
countrywomen, on the importance of a general and somewhat extensive
acquaintance with those arts, on which so much of the comfort of
individual and domestic life depends. Economy of time, labor, and
expenses, is an essential requisite in every family; and will ever claim
a due share of attention, from her who is desirous of fulfilling with
credit to herself and advantage to others, the allotted duties of her
appointed station. To those, who are at the head of the majority of
families, an extensive knowledge of the various departments of plain
needlework is indispensable. The means placed at their disposal are
limited; in many instances, extremely so: and to make the most of these
means, generally provided by the continual care and unremitting
attention of the father and the husband, is a sacred duty, which cannot
be violated without the entailment of consequences which every well
regulated mind must be anxious to avoid.
The following are the principal stitches used in plain needlework.
[29]Sewing and Felling.—If you have selvages, join them together and sew
them firmly. If you have raw edges, turn down one of the edges once, and
the other double the breadth, and then turn half of it back again. This
is for the fell. The two pieces are pinned face to face, and seamed
together; the stitches being in a slanting direction, and just deep
enough to hold the separate pieces firmly together. Then flatten the
seam with the thumb, turn the work over and fell it the same as hemming.
The thread is fastened by being worked between the pieces and sewn over.
Hemmings.—Turn down the raw edge as evenly as possible. Flatten, and be
careful, especially in turning down the corners. Hem from right to left;
bring the point of the needle from the chest toward the right hand.
Fasten the thread without a knot, and when you finish, sew several
stitches close together, and cut off the thread.
German Hemming.—Turn down both the raw edges once, taking care so to do
it, as that both turns may be toward your person; you then lay one below
the other, so as that the smooth edge of the nearest does not touch the
other, but lies just beneath it. The lower one is then to be hemmed or
felled to the piece against which you have laid it, still holding it
before you. You are next to open your sleeve, or whatever else you have
been employed upon; and laying the upper fold over the lower, fell it
down, and the work is done.
Mantuamaker’s Hem.—You lay the raw edge of one of your pieces a little
below the other; the upper edge is then turned over the other twice, and
felled down as strong as possible.
Running.—Take three threads, leave three, and in order that the work
may be kept as firm as possible, back-stitch occasionally. If you sew
selvages, they must be joined evenly together; but if[30] raw edges, one
must be turned down once, and the other laid upon it, but a few threads
from the top. It is, in this case, to be felled afterwards.
Stitching.—The work must be even as possible. Turn down a piece to
stitch to, draw a thread to stitch upon, twelve or fourteen threads from
the edge. Being thus prepared, you take two threads back, and so bring,
the needle out, from under two before. Proceed in this manner, to the
end of the row; and in joining a fresh piece of thread, take care to
pass the needle between the edges and bring it out where the last stitch
was finished.
Gathering.—You begin by taking the article to be gathered, and dividing
it into halves, and then into quarters, putting on pins, to make the
divisions. The piece, to which you are intending to gather it, must be
gathered about twelve threads from the top, taking three threads on the
needle, and leaving four; and so preceding, alternately, until one
quarter is gathered. Fasten the thread, by twisting it round a pin;
stroke the gathers, so that they lie evenly and neatly, with a strong
needle or pin. You then proceed as before, until all the gathers are
gathered. Then take out the pins, and regulate the gathers of each
quarter, so as to correspond with those of the piece to which it is to
be sewed. The gathers are then to be fastened on, one at a time; and the
stitches must be in a slanting direction. The part to be gathered must
be cut quite even before commencing, or else it will be impossible to
make the gathering look well.
Double Gathering, or Puffing.—This is sometimes employed in setting on
frills; and when executed properly has a pretty effect. You first gather
the top, in the usual way; then, having stroked down the gathers, you
gather again under the first gathering, and of such a depth as you wish
the puffing to be. You then sew on[31] the first gathering to the gown,
frock, &c. you design to trim, at a distance, corresponding with the
width of the puffing: and the second gathering sewed to the edge, so as
to form a full hem. You may make a double hem, if you please, by
gathering three times instead of only twice; and one of the hems may be
straight, while the other is drawn to one side a little. This requires
much exactness, in the execution; but if properly done, it gives a
pleasing variety to the work.
Whipping.—You cut the edge smooth, and divide into halves and quarters,
as for gathering. You then roll the muslin or other material very
lightly upon the finger, making use of the left thumb for that purpose.
The needle must go in on the outside, and be brought through, on the
inside. The whipping-cotton should be as strong and even as possible. In
order that the stitches may draw with ease, they must be taken with
great care. The roll of the whip should be about ten threads.
Button-hole Stitch.—These should be cut by a thread, and their length
should be that of the diameter of the button. In working, the
button-hole must lie lengthways upon the forefinger; and you begin at
the side which is opposite to the thumb, and the furthest from the point
of the finger on which it is laid. The needle must go in on the wrong
side, and be brought out on the right, five threads down. To make the
stitch, the needle is passed through the loop before it is drawn close.
In turning the corners, be careful not to do it too near; and in order
that a proper thickness may be obtained, it is necessary that the needle
should go in between every two threads. Making button-holes, requires
great care and attention.
[32]
Fancy Button-hole Stitch.—This resembles a very wide button-hole
stitch, and is very neat for the fronts of bodies, where it has a very
pretty appearance; likewise for the bands and the shoulder bits, and
above the broad hems and tucks of frocks.
Chain Stitch.—In making this stitch, you are to employ union cord,
bobbin, or braid, whichever you think most suitable. Make a knot at the
end, and draw it through to the right side. While you put in the needle,
let the end hang loose, and bring it out below, so as to incline a
little towards the left hand. Pass your needle over the cord, as you
draw it out, and this will form a loop. In drawing out the mesh, you
must be careful not to draw the stitch too tight, as that would destroy
the effect. You proceed in the same manner to form the next, and each
succeeding loop; taking care to put the needle in a little higher, and
rather more to the right than in the preceding stitch, so that each loop
begins within the lower part of the one going before it, and you thus
produce the resemblance of a chain.
Fancy Chain Stitch.—The only difference between this and the common
chain stitch, is that very little of the cord is taken up on the needle
at a time, and the stitches are far from each other. Its appearance will
be varied, according as you put in the needle, to slant little or much.
If you should work it perfectly horizontal, it is the same as
button-hole stitch.
[33]
Herring-boning.—This is generally employed in articles composed of
flannel, or other thick material. The edge is to be cut even, and turned
down once. You work from left to right, thus: Put your needle into the
material, and take a stitch of two or three threads, as close as
possible, under the raw edge, and bring the needle half way up that part
which is turned down, and four or five threads toward the right hand;
make another stitch, and bring down the needle; thus proceed until the
work is finished. This stitch is something like the back-bone of a fish,
and is sometimes used as an ornament for children’s robes, and at the
top of hems. It looks both neat and elegant, when carefully executed.
Fancy Herring-boning.—This is the same as common herring-bone, only it
is done in a perpendicular manner, instead of being worked horizontally
from left to right; and the thread is brought round behind the needle,
so as to finish the work in a more elegant manner. It has an exceeding
neat and pleasing look, when it is well executed, and is considered as
highly ornamental, in appropriate situations.
Angular Stitch.—This stitch resembles button-hole stitch, only it is
carried from right to left to form the pattern. It is a neat ornament
for cuffs, skirts and capes, and children’s pelisses. As much of its
beauty depends on its regularity, care should be taken to make the
patterns very even and straight, and of an equal width; without due
attention to this, the work will be spoiled.
[34]
Double Herring-boning.—This pattern is a kind of double herring-bone,
on each side; it is too intricate to describe minutely. The engraving
will give a better idea of this stitch than any description we could
give. Great care being required to keep the pattern even, it is
advisable to run a tacking thread down the middle of it, to serve as a
guide.
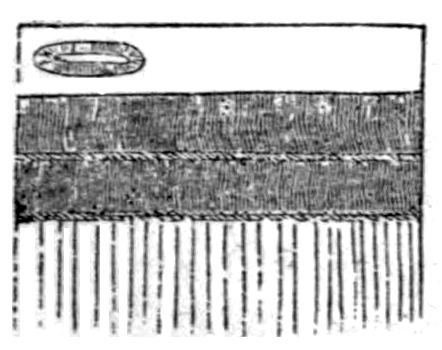
Horse-shoe Stitch.—This is done with thick, loosely-twisted cotton, or
bobbin, and is worked from left to right, as shown in the accompanying
engraving. It has a very neat and pretty appearance, when worked near
the edge of hems, robings, &c.
Fancy Bobbin Edging.—This is formed by a succession of loops made in
the following manner: Make a knot at the end, and put the needle through
to the right side, just below the hem. Bring the bobbin over the hem,
and, putting the needle in at the wrong side, bring it through to the
right. Draw the loop to the size you desire, pass the bobbin through it,
and commence the next stitch, proceeding as before.
Chain Stitch, on Gathers.—This looks well, if worked in colored
worsted, or in cord. Two gathers are taken up for each stitch, taking
care always to take one of the previous stitches and one new gather on
the needle at the same time.
[35]
Coral Pattern.—This requires great accuracy in the working, and it is
advisable for the inexperienced to run lines, in long stitches, to fix
the middle and outsides of the pattern. It may be best understood by the
engraving, merely observing that the stitch is begun on the left hand,
and continued alternately from left to right, always pointing the needle
toward the centre. It is very suitable for the waist-bands of children’s
frocks, the tops of broad hems, &c.
Serpentine Stitch.—This is exceedingly pretty, and is much employed for
children’s dresses. It is worked with the hand, being sewn on to the
material when made. Take the cord, knot it so as to form a loop at the
end; then pass the other end through the loop, toward the front, to form
another loop to the right hand; continue passing the bobbin through the
loop on one side, then through the loop on the other, directing the cord
so as to pass from the side of the work invariably towards the inner, or
that part next the work.
Biassing.—In this operation, the first part of the stitch is the same
as gathering. You then stitch down; and upon the right side of the
gather, you lay a thread a good deal thicker than the one you used for
gathering thread. Over this thread you sew, taking care to take hold
also of the gathering thread. The needle is always to be pointed toward
your chest. You may work two or three rows in this way, on[36] the sleeves
and shoulders of dresses, &c., which has a handsome effect. You must
take great care to bring the needle out between each one of the gathers.
Honey Combing.—The material may be velvet, silk, &c.; and the mode of
working is as follows: The piece you intend honey-combing, must be
creased in regular folds, taking care that they are as even as possible.
Then make the folds lie closely together, by tacking them with a strong
thread, and in long stitches. You then take silk of the right color;
stitch together at equal and proper distances the two first folds, and
proceed, with each succeeding two, in the same manner, only taking the
stitches in the intermediate spaces. Thus the stitches of each alternate
row will correspond together. Draw out the thread, when the work is
finished, and on pulling it open, it will form diamonds on the right
side. This work is proper for the inside of work-boxes, and is sometimes
employed to ornament the tops of beds. It looks well, if carefully
executed.
A perfect acquaintance with these various stitches, will enable the
practical needlewoman to pursue her occupation with ease and pleasure.
[37]
Please
do not post this pattern to another website. However, Please feel free
to post a link to this page:
http://www.knitheaven.com/vintagepatterns/lwtb_CHAPTER_II.htm |