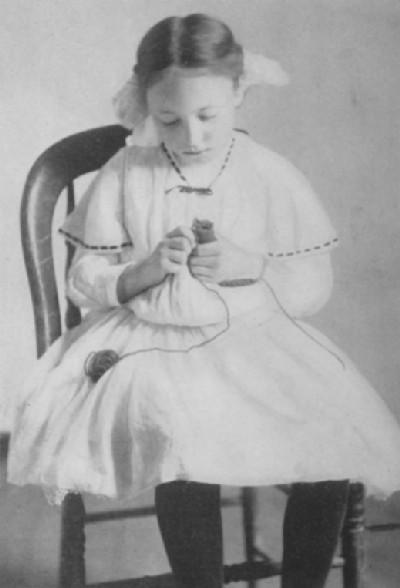
Few
elementary
exercises
have aroused
more
interest in
the child
than the toy
knitting;
due,
perhaps, to
its
simplicity
and his
power to do
it easily
and well.
To some
keen
observer the
little
orb-weaving
spider may
have
suggested
this form of
occupation.
Be this as
it may, the
child who is
a lover of
nature will
be quick to
perceive the
strong
resemblance
he bears to
this little
insect while
at work with
his toy
knitter,
going from
post to post
just as the
insect
worked its
net in
spiral form
on his
framework of
radiating
lines.
The
possibilities
of an empty
spool and a
few pins are
almost
without
limitations.
The
illustrations
here given
are merely
suggestive
of many more
that can be
worked out
along these
lines. They
are not
simply to
momentarily
attract the
child, but
to permit of
individual
growth, and
to have him
participate
in the joy
of its
ultimate
use.
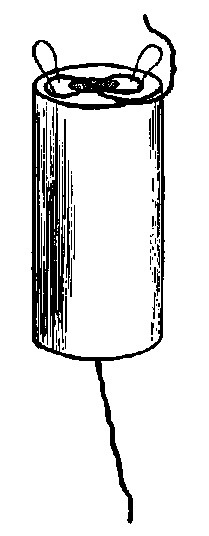
Toy
knitters are
made of a
cylindrical
piece of
wood two and
one-half or
three inches
long and at
least one
inch in
diameter.
This size
enables the
child to
grasp it
easily and
work without
cramping the
fingers. A
hole
one-fourth
or one-half
inch in
diameter is
bored
lengthwise
through the
center to
admit the
work. Spools
are used to
advantage
where
knitters
cannot be
obtained.
Pins,
staples, or
wire nails
are used as
posts. These
are driven
into the
wood and
then curved
outward a
little at
the top with
pliers, to
prevent the
work from
slipping
off. One,
two, three
or four
posts may be
used.
A number
of forms of
web can be
made, but
the simplest
and quickest
are those
made on the
knitters
having but
two posts.
The
four-post
knitters are
also simple
and are used
where a
thick cord
is needed.
Except
otherwise
specified
two-post
knitters are
used for
these
models.
Drop
worsted
through the
hole in the
center of
the knitter
and draw it
out at the
other end,
three
inches. This
end is used
to draw the
work through
the knitter.
Carry the
worsted
leading from
the ball,
around the
post to the
right,
across the
center of
the hole in
the knitter
and around
the post to
the left;
then back
across the
center to
the post at
the right,
thus making
two stitches
on this
post. Lift
the lower or
first stitch
with a large
pin or
knitting
needle,
carry it
over the
second
stitch and
drop it over
the post;
then across
the center
to the post
at the left
and repeat.
So continue
until the
desired
length is
obtained.
It will
require
seven yards
of yarn to
make one
yard of web
on the
two-post
knitter.
Begin in
the same way
as for round
web, but
after
carrying the
first or
lower stitch
over the
second
stitch on
each post,
bring the
worsted back
around the
same post,
and over to
the post on
the opposite
side and
repeat. This
will leave
two stitches
on each
post. In
knitting
flat webs,
two stitches
must always
be left on
the end
posts, and
these two
are carried
over the
third stitch
and dropped
over the
post in
working back
and forth.
It requires
eleven yards
of yarn to
make one
yard of flat
web on the
two-post
knitter.
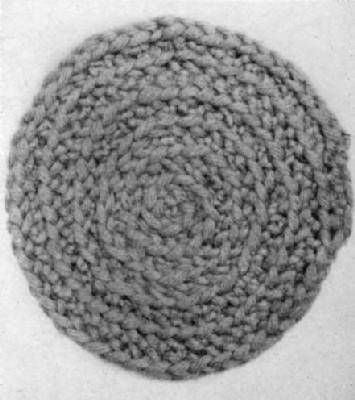
A mat
five inches
in diameter
requires two
and one-half
yards of
round web.
Start sewing
with the
piece of
worsted
hanging from
the end of
the web.
Coil and sew
in place by
taking up
the
underhalf of
a stitch on
the right,
then the
underhalf of
a stitch on
the left
side usually
called "ball
stitch."
Continue
alternating
from right
to left,
taking up
one stitch
at a time
except when
it is
necessary to
widen; then
sew two
stitches of
the web into
one in the
mat.
Run the end
of sewing
thread back
in the
sewing to
fasten it.
When
starting
with a new
sewing
thread, put
the needle
in one inch
back from
where sewing
ended and
run it
through the
work to
where the
last stitch
was taken.
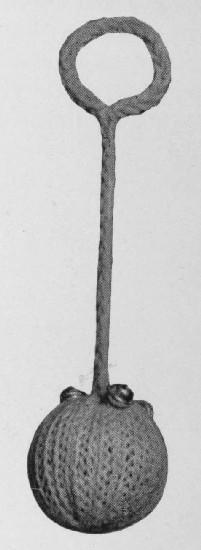
Use round
web. Start
with end of
web and sew
and coil as
for round
mat. Widen
only when
necessary to
keep it from
drawing in
too quickly.
When desired
width or
center of
ball is
reached,
fill with
tissue paper
or a ball of
soft cotton.
The sewing
is then
continued
and each row
narrowed off
by taking
two stitches
in part
already
sewed and
one in the
web. When
the same
number of
rows is
narrowed the
filling
should be
entirely
covered. The
end left
over will
serve as a
cord for the
ball.
Flat web may
be used by
taking
twelve
pieces three
inches long
and sewing
them
together—alternating
color and
white, if
desired. Run
a
draw-thread
around the
bottom and
fill with
paper or
cotton; then
run a
draw-thread
around the
top. Finish
with a cord
made of a
piece of
round web.
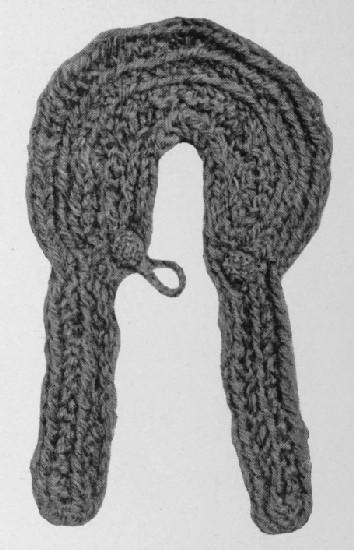
Round web
five yards.
Measure the
doll’s neck
for collar.
Gradually
widen each
row in the
back. Bring
the third
row of web
down in
front to
form the
tabs; then
up to the
back of
collarette
and finish
the back,
bringing the
last row
down in
front into
the tabs.
Paper
patterns may
be used as a
guide, but
children
should be
encouraged
to draw and
cut their
own
patterns.
Measure
the doll’s
head and
make the top
of the crown
twice the
diameter of
the head. It
is sewed in
the same way
as the
circular
mat. When
the desired
width of
crown is
obtained,
begin the
under side
of the crown
by narrowing
off—that is,
taking two
stitches in
the crown
and sewing
them into
one stitch
in the web.
Continue
until the
desired
opening for
the head is
obtained.
Two rows of
web will
complete the
headband.
Finish with
a pompon on
top.
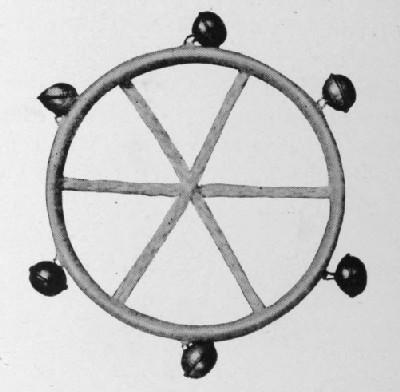
The
foundation
ring is made
of a piece
of splint or
flat pith
fifteen
inches long.
Form this
into a ring,
having the
ends lap two
inches.
Wrap this
with
knitting
cotton or
yarn, being
careful to
keep winding
even. When
the winding
is
completed,
draw the end
of cotton
underneath
the winding
with a
needle to
fasten it.
Use three
pieces of
round web
for spokes.
Fasten all
three
together in
the center.
Bells may be
sewed on the
outside or
inside of
the ring.
To make a
cap five
inches long
and four
inches wide,
knit
eighty-four
inches of
flat web.
Begin five
inches from
the end of
the web,
turn and sew
into a
rectangular
form five
inches wide
and eight
inches long.
Join the
five-inch
ends, and
draw in the
top with the
needle and a
piece of the
material
from which
the cap was
made. After
securing the
top, twist
and fold the
piece of
yarn
remaining
for a cord
and fasten a
number of
strands of
yarn through
the loop for
a tassel.
Length of
sole, five
and one-half
inches. It
is well to
have the
soles before
beginning to
sew. They
can be
secured at
any store.
Each
slipper
requires two
and one-half
yards of
round web.
Start at the
back of the
heel (A, of
illustration),
and make the
first two
rows three
inches high,
then
gradually
shorten the
next three
rows, and
keep each
row this
height until
the instep
is finished.
The first
row on the
vamp (B, of
illustration)
is made one
inch higher
than the
side. Each
row is then
gradually
shortened,
the last row
being
three-fourths
of an inch
high (C, of
illustration).
This will
complete
one-half of
the slipper.
The other
half is made
in just the
reverse way
by
continuing
the sewing
from the toe
(C, of
illustration)
back to the
heel, taking
care that
each row is
exactly the
same height
as the
corresponding
row on the
opposite
side.
Join the
back of the
heel and sew
to the soles
before
closing the
vamp in
front. Sew
vamp up the
center by
catching
corresponding
loops
together.
Make cord
and tassel
to go around
the top, as
in
illustration
of finished
slippers.
Sixty
inches of
flat web
will be
required for
each mitten.
Cut off
eight pieces
six inches
long. In
cutting,
clip just
one stitch
and run the
ends across,
and sew them
into a
cylindrical
form. Draw
in the top
with a
needle and a
piece of the
material and
fasten
securely.
Leave an
opening on
one side for
the thumb.
The thumb
is made of
three pieces
sewed
together.
The longest
piece is
three inches
and the
others each
two and
three-fourths
inches long.
In sewing it
into the
mitten, have
the longest
piece come
down toward
the wrist.
Gradually
form and sew
it in place.
Draw in the
top and
fasten
securely.
CORD
This is made
of round
web, knitted
the desired
length. The
length will
vary a
little
according to
size of the
child, but
four and
one-half
feet is a
good length.
The mittens
are fastened
to the ends
of the cord.
Start
with the end
of the web
and sew into
a circular
form for the
crown. (See
illustration
A.) The
sixth row is
brought down
to within
one inch of
the center
of the back.
Turn and sew
around to
within one
inch from
the center
of the back
on the
opposite
side. This
will leave
two inches
free in the
back of the
hood. Turn
and continue
sewing in
this way for
five rows,
which will
form the
side of
hood.
The
remaining
part of the
web is then
brought
around the
face of the
hood and
across the
back, as one
would sew a
cord.
Finish with
cord and
tassel for
tie-strings.
A rosette of
yarn may be
made for the
top or side.
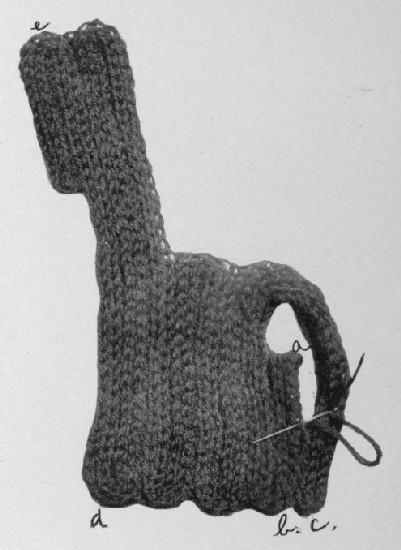
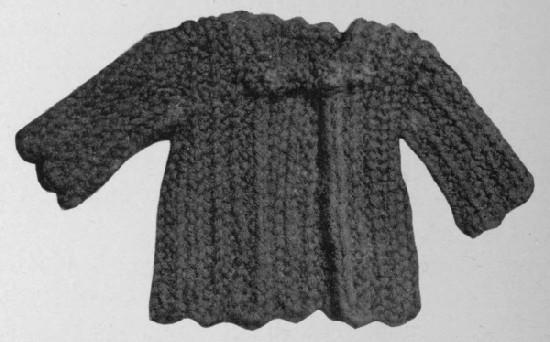
The coat
is begun at
the
under-arm
seam a.
For a coat
five inches
long begin
three inches
from the end
of the web
to make the
first turn.
Sew from
this turn to
the starting
end of the
web b,
fasten the
sewing
thread and
cut it off.
The second
row is made
eleven
inches long,
or long
enough to go
over the
shoulder and
down the
back, b
to c.
Sew four
rows in this
way to form
the front
and part of
the back;
then four
rows five
inches long
for the
back; then
four more
rows eleven
inches long
for the
other
shoulder and
front d
to e.
Sew the
fifth or
last row up
three inches
for the
other
under-arm
seam.
Join the
under-arm
seams,
leaving an
opening of
two inches
for sleeves
if they are
desired. If
not, the
armhole and
neck can be
finished off
with some
contrasting
color.
For the
sleeves,
measure the
length of
the doll’s
arm and make
the first
row this
length. Make
each row a
little
longer than
the
preceding
row until
the top or
shoulder
part is
reached,
then
gradually
shorten each
row until
the desired
width is
obtained.
The last row
should be
the same
length as
the first
row. When
sewing them
in the coat,
have the
longest part
come at the
top of the
shoulder.
Buttons are
made by
braiding
yarn and
sewing it in
the form of
buttons.
A cord for
fastening is
made by
braiding, or
twisting and
folding the
yarn. It is
then sewed
into loops
or used as
cord and
tassel for
tying.
Start two
inches from
the end of
the web for
the first
turn. Sew
into an
elliptical
form three
and one-half
inches long
for the
sole. Sew
two more
rows without
widening for
the sides of
the foot;
then sew two
rows across
the front
for the toe;
the third
row bring
all around
the top to
complete the
foot.
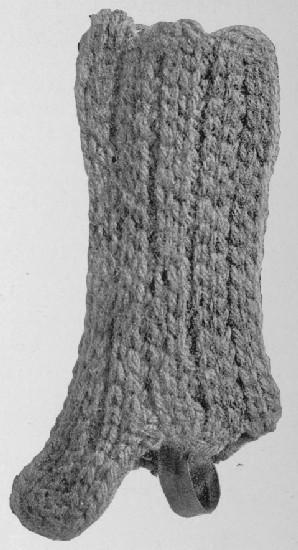
The leg of
the bootee
is made by
bringing the
web directly
upward three
inches
before
making the
first turn.
Make each
row three
inches high
and catch
each row
into the top
of the foot
while
sewing. Put
cord and
tassel
around where
the leg and
foot meet.
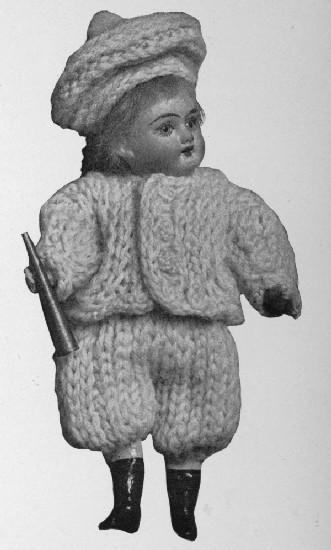
Make coat
according to
directions
given for
doll’s coat.
Measure
the length
of the
doll’s leg
for the
length of
the
trousers.
Use flat web
and sew it
into two
rectangular
pieces wide
enough to
make each
leg a little
full.
Join the
inside seams
part way and
then join
the open
edge of the
right front
with the
open edge of
the left
front. Do
the same
with the
back edges.
Put a
draw-string
around the
top, or a
piece of the
web may be
used for a
waistband.
Put in a
draw-string
around the
bottom of
each leg.
The doll
shown in
illustration
is ten and
one-half
inches tall.
To make cape
and hood in
one piece
sew two rows
of flat web,
six and
one-half
inches long,
for the
center of
the back.
These two
rows will
also give
the desired
fulness. The
next five
rows are
made
nineteen
inches long,
or long
enough to
reach over
the head and
down to form
the two
sides of the
cape and
hood. After
these five
rows are
completed,
sew five
rows six
inches long
on each side
of the front
of the cape,
to make it
wide enough
to meet
across the
chest.
Close the
cape and the
hood in the
back. The
part above
the six and
a half inch
rows will
form the
hood. Draw
in the top
of these two
short rows
and sew to
the base of
the hood.
Put in a
draw-string
around the
top of the
right side
of the cape
in front,
carry it
around the
base of the
hood, around
the top of
the cape on
the left
side and tie
in front.
This
skirt is
five inches
long and
made of flat
web. The
first and
last rows
are made one
and a
quarter inch
shorter than
the other
rows forming
the skirt.
These two
rows are
sewed
together
when the
skirt is
finished,
thus forming
the placket
and also the
desired
fulness in
the back.
There are
sixteen rows
in all. Each
two, when
sewed
together,
form a
scollop at
the top and
bottom where
the web is
turned. In
sewing care
must be
taken to
have each
row the
exact length
of the
preceding
row except
in the first
and last
row.
The top of
the skirt
may be
finished
with a
draw-string
or a band
made from
cloth. The
bottom of
the skirt
may be left
as it is, or
be finished
with a
blanket
stitch of
some
contrasting
color. The
skirt
requires
five yards
of flat web.
Measure
the child’s
head for the
size of the
hat. Make
the crown of
the hat
one-half of
this
measurement.
If the
child’s head
measures
twenty-two
inches
around, make
the crown
eleven
inches in
diameter.
The crown is
circular and
is made in
the same way
as the
circular
mat, taking
two stitches
of web and
sewing them
into one
stitch of
the crown
already
sewed to
keep it
flat. When
it is of the
desired
size, begin
the side by
sewing one
stitch of
the web into
one of the
crown, at
the same
time holding
the web to
be sewed
directly
under the
last row in
the crown.
Make the
side twice
as long as
the desired
height of
the hat. For
instance, if
the desired
height is to
be three and
a half
inches, make
the side
seven inches
long, as
one-half of
this
measurement
is turned
up.
Two
colors may
be used, one
color for
the crown
and one for
the side.
Red and
black or red
and white
are pretty
combinations.
A doll’s hat
of the same
style, the
crown three
and a half
inches in
diameter,
requires
five yards
of round
web.
This is a
combination
of flat and
round web.
Knit ten
inches of
flat web,
change to
round web by
bringing the
yarn across
the center
of the hole
in the
knitter to
the opposite
post, and
knit ten
inches, or
the number
of inches
necessary to
go around
the neck.
Change again
to flat web,
knit ten
inches and
clip off.
Make
seven such
pieces and
sew them
together to
form the
muffler. The
round web
will form
the neck
part.
Do not
remove from
the knitter
while
changing
from flat to
round web.
This is
made much in
the same way
as the
doll’s hood.
Make the
back of the
hood five
inches in
diameter,
then turn
the web and
form the
side. Sew
around to
within four
inches of
the place of
turning on
the opposite
side and
turn again.
So continue
until the
side is
sufficiently
wide to
cover the
child’s
head. Extend
this side
three inches
beyond the
desired
width,
widening on
each row of
the extended
part to give
fulness.
This
widening may
be omitted,
and the
extended
part turned
back,
leaving it
perfectly
plain, if
desired.
Trim with
rosettes or
pompons made
of the same
material as
the hood.
Turn back
the extended
part and
tack to the
hood. Sew a
pompon or a
rosette of
yarn over
the top of
the sewing
stitch. For
tie-strings,
use cord and
tassel, or
ribbon.
The hood
requires
from
twenty-five
to thirty
yards.
This
requires
twenty-five
yards of
round web.
Measure the
child’s head
for the size
of the hat.
Start the
crown in the
same way as
the circular
mat. When it
is five
inches in
diameter,
gradually
turn the
crown, while
sewing the
next five or
six rows.
When the
desired
width is
reached,
begin
forming the
side by
sewing one
stitch of
web into one
stitch of
the crown,
keeping each
row exactly
under the
preceding
row until
the desired
height is
obtained;
then
gradually
widen to
form the
rim, which
is three and
a half or
four inches
broad.
Do not
widen any on
the last two
rows, but
draw the web
a little
tighter
while sewing
to make the
edge of the
rim roll or
turn inward.
Finish with
cord and
tassels
around the
crown, or
pompons on
the right or
left side of
the front of
the hat.
This is
made of five
and one-half
yards of
flat web cut
into pieces
of a desired
length. Cut
three pieces
seven inches
long for the
front. One
inch and a
half of this
will also
form the
neck. When
cutting,
clip only
one stitch
and pull out
the ends.
The next
two pieces
are cut five
and one-half
inches long
and sewed
one on each
side of the
front one
inch and a
half below
the top end.
Each
succeeding
row is made
a little
shorter to
form the
shoulder,
the shortest
pieces
forming the
outside
edges.
Make the
back of the
sweater in
the same way
and sew
front and
back
together,
leaving one
and a
quarter inch
opening on
each side
for the
sleeves.
The sleeve
is made of
five pieces,
the longest
piece being
three
inches, and
the shortest
two and
one-half
inches long.
Sew these
pieces
together to
form the
sleeve. When
sewing it
into the
sweater,
place the
longest part
at the
shoulder
seam and
stretch the
armhole
while sewing
it in.
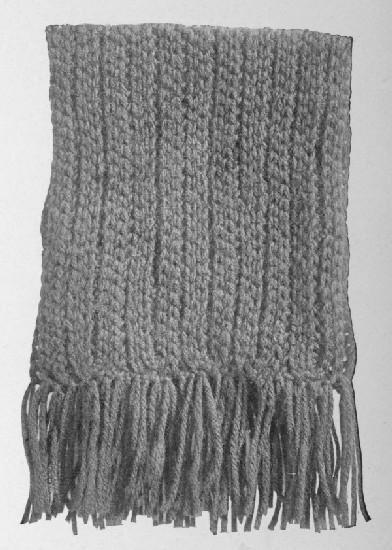
This may
be made of
round or
flat web,
and of any
desired
size. If the
shawl is to
be
thirty-six
inches long,
clip the web
into pieces
of this
length and
sew them
together
until the
shawl is of
the desired
width, or
the web may
simply be
turned at
the end of
each row,
then proceed
with the
sewing.
The
fringe for
the ends is
made by
cutting the
yarn into
lengths
twice as
long as the
desired
length of
the
fringe—that
is, if the
fringe is to
be five
inches long,
cut the yarn
into pieces
ten inches
long.
Fold each
ten-inch
piece in
two, slip
the folded
end through
a stitch in
the end of
the shawl
and draw the
two ends of
the piece
through the
loop thus
formed and
pull tight.
This robe
is ten
inches wide
and eighteen
inches long,
and is made
of four
pieces of
flat web,
each piece
three yards
long. Any
number of
pieces of
either round
or flat web
may be used,
and the robe
made wider
and longer
if desired.
Measure
fifteen
inches of
web and turn
it. Begin
sewing from
this, turn
down to the
end of the
fifteen
inches and
again turn,
bringing the
web around
over the
end. Care
must be
taken while
turning to
keep the
ends
perfectly
flat.
When the
three yards
are used
begin the
other parts
in the same
way. Make
four or any
desired
number of
parts, and
sew them
together,
alternating
the colors.
Put a tassel
made of the
same
material on
the rounded
end of each
part.
If round web
is used it
will require
more for
each part,
for the
round is not
as wide as
the flat
web.
Leggings
may be made
of round or
flat web.
Measure five
inches above
the knee
down to the
vamp of the
shoe for the
length of
the front
part of the
legging.
This gives
the length
of the first
row.
Turn the
web and
begin to sew
from this
point up to
the top,
then turn
again and
sew down to
the toe.
Continue in
this way
until the
front part
is two and
one-half
inches wide.
Bring the
remaining
rows down to
within two
inches of
the end of
the toe,
until the
legging is
wide enough
to go around
the child’s
leg, then
sew to the
opposite
side of the
front. Sew a
piece of
tape to the
instep.
This may
be made of
round or
flat web.
Make the
part to go
around the
neck first.
In this
model the
neck band is
ten inches
long and
three inches
wide. Sew
four rows of
flat or six
rows of
round web
for the
neck. Begin
three inches
from the
ends to make
the front.
Gradually
shorten each
row until it
is of the
desired
length.
Make
loops of
twisted yarn
and sew to
one end of
the neck
band to slip
over the
buttons. Sew
the buttons
on the
opposite end
and on the
inside where
they will be
hidden while
the muffler
is being
worn.
Knitting
cotton can
be secured
at any
department
store. It
comes in
colors
white,
black, red,
navy blue,
and mixed
colors. This
is not as
elastic as
worsted and
is used
where
strength is
required,
such as
bags,
hammocks,
wash-cloths,
etc. It is
very
inexpensive
and can be
used to
great
advantage.
Select a
piece of
jute, or
stout cord
the length
of the
desired
rope. Drop
one end of
this and one
end of the
knitting
cotton
through the
hole in the
knitter (use
knitter
having four
posts), and
draw it out
at the other
end three
inches.
Bring the
cotton
leading from
the ball
around each
post once,
then proceed
with the
knitting,
covering the
cord or jute
which is
used as a
core or
foundation
for the
rope.
Cords for
pillow tops
may also be
made in this
way.
These are
made of
coarse
knitting
cotton on
four-post
knitters.
Knit a piece
three yards
long for the
reins. The
children
measure each
other for
the
breast-piece,
which will
be from ten
to twelve
inches long.
This is
fastened to
the reins
nine inches
below the
center of
the neck on
each side,
to allow the
head to pass
through
easily.
Two
colors may
be used in
knitting the
reins,
working
around first
with one
color, then
with the
other.
Fourteen
yards of
knitting
cotton will
make one
yard of web
on the
four-post
knitter.
This is
made of
white
knitting
cotton. It
requires
nine yards
of web for a
cloth ten by
twelve
inches.
Measure
twelve
inches of
web, turn
and sew
toward the
end.
When the
twelve-inch
piece is
sewed turn
again and
sew.
Continue in
this way
until the
desired size
is obtained.
With a piece
of the
cotton make
a loop at
one corner
by which to
hang it.
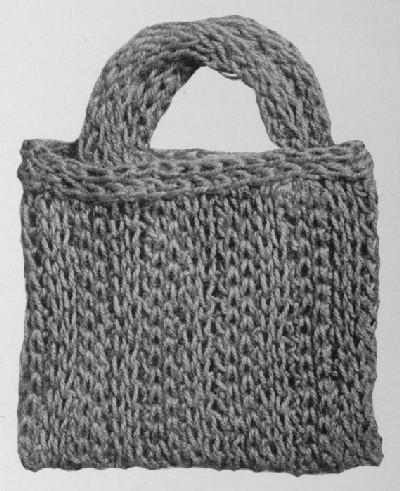
This may
be made of
round or
flat web. A
bag twelve
inches deep
and fourteen
inches wide
requires
thirty
yards.
Measure
twenty-four
inches of
web and
turn. Begin
sewing from
this turn to
the end of
the
twenty-four
inches then
turn again.
So continue
until this
oblong piece
measures
fourteen by
twenty-four
inches. Fold
this in two
and sew up
the sides.
This will
avoid any
seam in the
bottom of
the bag.
Make
handles in
the same way
as for
jumping-rope,
or a double
thickness of
the web may
be used for
each handle
and sewed to
the top
sides of the
bag. Finish
by sewing a
piece of the
web around
the top.
Laundry
bags, sewing
bags, and
little bags
for holding
paints and
water-dish
may be made
in similar
way.
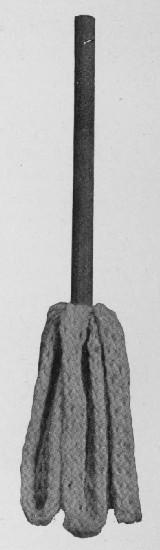
This is
made of
white
knitting
cotton. It
requires two
yards of
flat or
three yards
of round
web.
Secure a
piece of
stick or
better still
a piece of
half-inch
dowel ten or
twelve
inches long,
for a
handle. Cut
a groove
with a knife
around one
end to keep
the web from
slipping
off.
Sew the web
into loops
three and a
half or four
inches long.
Draw them in
around the
end of the
handle with
the sewing
string just
in the
groove; then
wind the
sewing
string
around two
or three
times, tie,
and clip off
the ends.
This is
made of flat
web. A
hammock
eight by
twelve
inches
requires
five and
one-half
yards. Sew
this into an
oblong piece
twelve
inches long
and eight
inches wide.
Secure a
piece of
cardboard
three inches
longer than
the oblong
piece and
one inch
wider.
Round off
the corners
with a pair
of scissors
(see
illustration),
and cut
notches or
slits in
ends
one-half
inch apart.
Sew two
brass rings
in the
center of
one side,
and on the
other baste
the oblong
piece which
is to be
used for the
hammock.
Then with a
needle and a
long piece
of the
knitting
cotton begin
making the
ends of the
hammock by
securing one
end of the
sewing
string to
the hammock
and bring it
over the end
of the
cardboard in
the first
slit from
the end and
through the
ring on the
opposite
side of
cardboard;
back over
cardboard,
through
second slit
and through
hammock.
So
continue
until one
end is
finished. Do
the same
with the
other end.
These
strings may
be held in
place by
putting
three or
four rows of
weaving just
underneath
the rings.
Clip the
basting
stitches and
remove from
the
cardboard.
Make fringe
as for
shawl.
--------------
the end.
Please do
not post
these
patterns to
another
website.
However,
Please feel
free to post
a link to
this page:
http://knitheaven.com/kids.htm
It's not crafts but
a nutrition game (My
Pyramid Blast off)
from the US
Department of
Agriculture for kids
to fuel their rocket
with food and
activities.
A
historical look at
the Red Cross blood
donor service
inspired by posters.
Doesn't show those
great knitting ones
though:(
This space is for YOUR idea or recommendation!!!
Please submit ideas.....We want to hear from you:)
Hi, I'm Jancee, a college student,
no kids yet, pretty new to knitting. So why am I
writing to kids corner? lol I was in b&n looking
around and spotted the book, Kids Knitting. I didn't
plan on buying it (since no kids, ya know), but I
did and I love it. It's got neat ideas, like using
unusual yarns, how to make your own knitting
needles, (I didn't know you could do that!), and
neat looking socks, and bags and stuff like that.
Anyway, the pics are cute, I think I can do some of
this stuff, and I bet kids might like it too. It
does say projects for kids of all ages. So that's
why I wrote.
KnitHeaven Adds:
HGTV gives a great
review (with
directions from the book for making your own
knitting needles, hat, and knitted ball)
of "Kids Knitting."
KnitHeaven Adds:
There is also
another book with a similar title called "Kids
Knit!" The author, Sarah Bradberry, has her own
website where she shows some fun
kids crafts ideas.