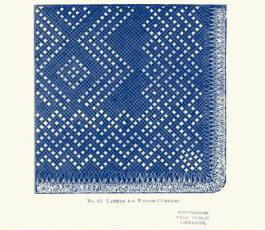
Use cotton No. 10 for embroidering the pattern. Meshes No. 4, No. 6, and a flat mesh three-fourths of an inch in width, will be required for the edge, Commence with a foundation of 300 loops on mesh No. 4, and net till the length required is worked; then net the following edge at the sides and end; net two loops in every loop on the large mesh, making four loops in the corner loops.—
- 2d row. Take two loops together, netting two in these.—
- 3d row. Take every loop on mesh No. 6.—
- 4th row. Like 3d row.—
- 5th row. Net two loops in every loop on the large mesh.—
- 6th and 7th rows. Like 3d and 4th. Work the pattern in darning-stitch, as in illustration.
#2
NETTED WINDOW CURTAIN
If worked with the above cotton and mesh four squares will measure one inch, which will be a guide for the number of foundation stitches to make in the beginning for the curtain. The pattern must afterwards be darned in embroidering cotton, No. 30, according to the engraving, by passing the needle under and over the threads of the meshes very regularly and even, always keeping the same number of threads in every square, and all must run the same way and be drawn to one degree of tightness, for all the beauty of the work depends upon its evenness and regularity. This pattern may be extended to any size, and would look very well if the flowers were sewn in pale pink ingrain cotton, and the fretwork in white cotton.
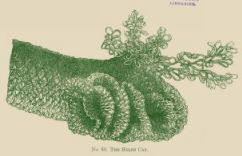
68THE HELEN CAP. (Netting)
The cap is worked in honeycomb netting, and the borders and rosette in plain netting. With the darkest shade make a foundation of 56 stitches on mesh No. 3, net 2 rows with each shade, increasing a stitch at the end of each row; leave one-half of the cap plain, and net a border in the following manner on the remaining loops and at the ends:—With the darkest shade net 4 loops in every loop on the flat mesh, increasing by making 6 loops in each of the three corner stitches; then on mesh No. 3, net 1 loop in each, and finish by netting a row with the next shade on the smallest mesh: this must be repeated at each side of the cap. For the second border, net 100 loops on the flat mesh on a foundation of wool, and finish to correspond with the first border. Two pieces netted in this manner are required, and they are arranged in festoons at the sides of the cap. Pass a cord the size required through the foundation-stitches, join it, and sew on a rosette made in the following manner:—With the darkest shade net 100 loops on mesh No. 3; then with the next shade net 2 rows at each side and at the ends; make this into a rosette with long ends, as in illustration.
This elegant and becoming head-dress derives its name from the beautiful sister-in-law of the Emperor of Russia, the Grand Duchess Helen, who introduced this style of coiffure at St. Petersburg.
Reprinted from The Lady’s Album of Fancy Work (1850). Free for personal use. Please share a link rather than copying this page.